Oxidized with Azure AD SAML Authentication
Anyone still use RANCID (Really Awesome New Cisco Config Differ) to backup network configuration? In my current position, I just needed something “simple” that would capture backups of my network devices. RANCID provided what I needed, and allowed for the versioning to placed into Git. I’ve decided that it was probably time to replace RANCID with something a little more modern. Now, I know there are many off-the-shelf options that would suffice my requirements. However, I needed a low/no cost solution. I decided to return to a tool I learned of several years ago: Oxidized.
One major issue with Oxidized is that it lacks an authentication method to protect it. My intent was to front Oxidized with an authentication method that would leverage my company’s Azure AD instance. In my research I learned of OAuth2 Proxy which acts a reverse proxy to the application and forces users to autheticate again the specified provider. So, let’s give this a shot.
First, I want to continue my method to containerize the applications that I use. Thankfully for both Oxidized and OAuth2 Proxy, someone actively updates the containerized versions based on changes to their code.
Build Oxidized Instance
Let’s start by building Oxidized and getting it up and running. The following is my initial Docker Compose file:
version: '3.4'
services:
  oxidized:
    image: oxidized/oxidized:latest
    container_name: oxidized-test
    hostname: oxidized-test
    ports:
            - '127.0.0.1:8889:8888'
    volumes:
    - ./oxidized/config:/home/oxidized/.config/oxidized/config
    - ./oxidized/router.db:/home/oxidized/.config/oxidized/router.db
    - ./oxidized/model:/home/oxidized/.config/oxidized/model
    - ./oxidized/data:/home/oxidized/.config/oxidized/devices.git/
    restart: unless-stopped
For my Oxidized configuration, I used the following:
---
username: <username>
password: <password>
model: ios
resolve_dns: true
interval: 3600
use_syslog: false
debug: false
threads: 30
use_max_threads: false
timeout: 20
retries: 3
prompt: !ruby/regexp /^([\w.@-]+[#>]\s?)$/
rest: 0.0.0.0:8888
next_adds_job: false
vars: {}
groups:
  cube:
group_map: {}
models: {}
pid: "/home/oxidized/.config/oxidized/pid"
crash:
  directory: "/home/oxidized/.config/oxidized/crashes"
  hostnames: false
stats:
  history_size: 10
input:
  default: ssh, telnet
  debug: false
  ssh:
    secure: false
  ftp:
    passive: true
  utf8_encoded: true
output:
  default: git
  git:
    user: oxidized
    email: oxidized@cpajr.com
    repo: "/home/oxidized/.config/oxidized/devices.git"
source:
  default: csv
  csv:
    file: "/home/oxidized/.config/oxidized/router.db"
    delimiter: !ruby/regexp /:/
    map:
      name: 0
      ip: 1
      model: 2
    gpg: false
model_map:
  cisco: ios
For my router.db, the following is an example:
switch:192.168.1.10:cisco
With these configurations in place, I can start the Oxidized container and verify it functioning. The following is the output from the initial start:
<>:/projects/test-cpajr# docker compose up
[+] Running 2/2
Network test-cpajr_default Created
Container oxidized-test Created
Attaching to oxidized-test
oxidized-test | *** Running /etc/my_init.d/00_regen_ssh_host_keys.sh...
oxidized-test | *** Running /etc/my_init.d/10_syslog-ng.init...
oxidized-test | Mar 22 20:45:53 oxidized-test syslog-ng[14]: syslog-ng starting up; version='3.25.1'
oxidized-test | *** Booting runit daemon...
oxidized-test | *** Runit started as PID 22
oxidized-test | Mar 22 20:45:54 oxidized-test cron[28]: (CRON) INFO (pidfile fd = 3)
oxidized-test | Mar 22 20:45:54 oxidized-test cron[28]: (CRON) INFO (Running @reboot jobs)
oxidized-test | I, [2023-03-22T20:45:54.957998 #30] INFO -- : Oxidized starting, running as pid 30
oxidized-test | I, [2023-03-22T20:45:54.959062 #30] INFO -- : lib/oxidized/nodes.rb: Loading nodes
oxidized-test | I, [2023-03-22T20:45:55.214018 #30] INFO -- : lib/oxidized/nodes.rb: Loaded 1 nodes
oxidized-test | Puma starting in single mode...
oxidized-test | * Version 3.11.4 (ruby 2.7.0-p0), codename: Love Song
oxidized-test | * Min threads: 0, max threads: 16
oxidized-test | * Environment: development
oxidized-test | * Listening on tcp://0.0.0.0:8888
oxidized-test | Use Ctrl-C to stop
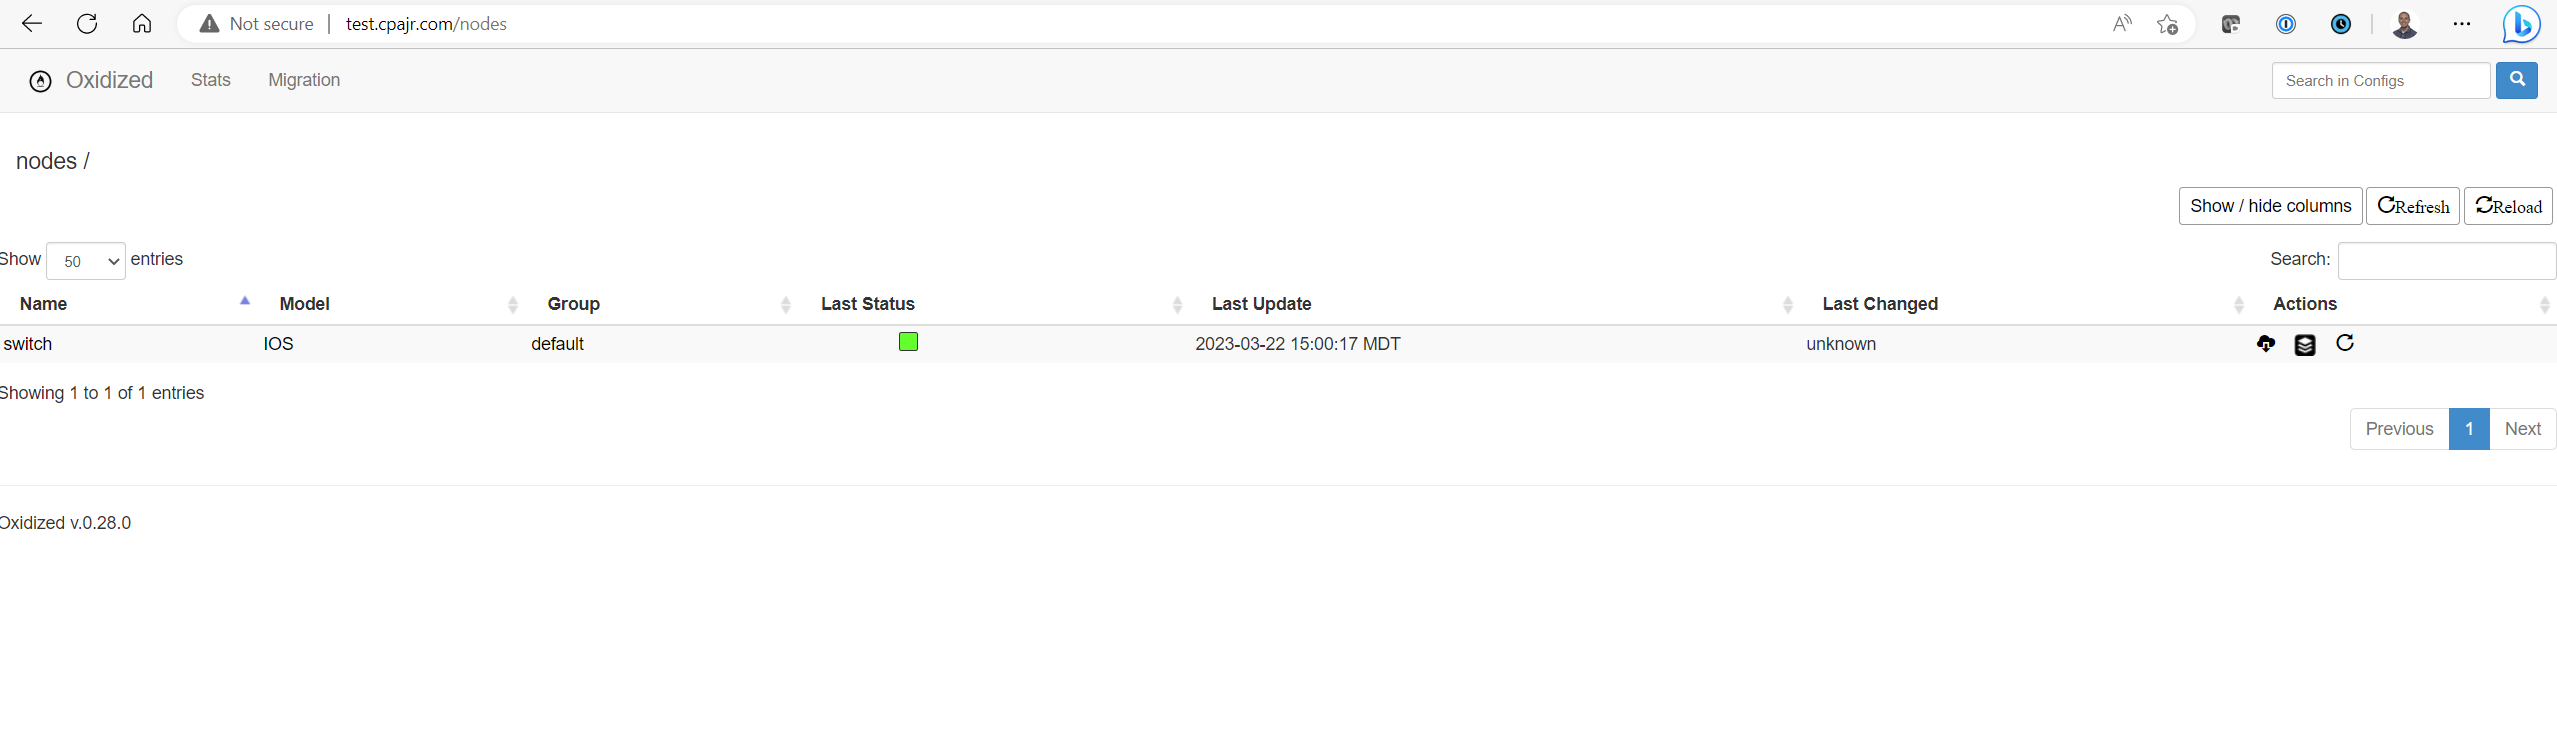
oxidized-test | I, [2023-03-22T20:46:02.806040 #30] INFO -- : Configuration updated for /switch
You’ll want to address any errors you find in deploying the container. Also, you’ll want to look for the output saying that Configuration updated for /switch – this tells me that Oxidized successfully pulled the configuration from the switch.
Nginx Reverse-Proxy Configuration
Personally, I am not expert in all of these things so I rely on others with more experience to show me how to do it. For configuring Nginx and Let’s Encrypt, I rely on Digital Ocean’s articles. My initial Nginx configuration looks like the following:
server {
	location / {
		proxy_pass http://localhost:8889;
		proxy_set_header X-Forwarded-Host $http_host;
		proxy_set_header X-Real-IP $remote_addr;
		proxy_set_header X-Forwarded-Proto $scheme;
	}

	listen 80;
    listen [::]:80;
	server_name test.cpajr.com
}
With this running, and along with the container operating, you should be able to pull up the website without encryption.
Now issue the command to let Let’s Encrypt configure itself:
<>:/etc/nginx/sites-enabled# certbot --nginx -d test.cpajr.com
Saving debug log to /var/log/letsencrypt/letsencrypt.log
Plugins selected: Authenticator nginx, Installer nginx
Obtaining a new certificate
Performing the following challenges:
http-01 challenge for test.cpajr.com
Waiting for verification...
Cleaning up challenges
Deploying Certificate to VirtualHost /etc/nginx/sites-enabled/test.cpajr.com

Please choose whether or not to redirect HTTP traffic to HTTPS, removing HTTP access.
- - - - - - - - - - - - - - - - - - - - - - - - - - - - - - - - - - - - - - - -
1: No redirect - Make no further changes to the webserver configuration.
2: Redirect - Make all requests redirect to secure HTTPS access. Choose this for
new sites, or if you're confident your site works on HTTPS. You can undo this
change by editing your web server's configuration.
- - - - - - - - - - - - - - - - - - - - - - - - - - - - - - - - - - - - - - - -
Select the appropriate number [1-2] then [enter] (press 'c' to cancel): 2
Redirecting all traffic on port 80 to ssl in /etc/nginx/sites-enabled/test.cpajr.com

- - - - - - - - - - - - - - - - - - - - - - - - - - - - - - - - - - - - - - - -
Congratulations! You have successfully enabled https://test.cpajr.com

You should test your configuration at:
https://www.ssllabs.com/ssltest/analyze.html?d=test.cpajr.com
- - - - - - - - - - - - - - - - - - - - - - - - - - - - - - - - - - - - - - - -

IMPORTANT NOTES:
 - Congratulations! Your certificate and chain have been saved at:
   /etc/letsencrypt/live/test.cpajr.com/fullchain.pem
   Your key file has been saved at:
   /etc/letsencrypt/live/test.cpajr.com/privkey.pem
   Your cert will expire on 2023-06-20. To obtain a new or tweaked
   version of this certificate in the future, simply run certbot again
   with the "certonly" option. To non-interactively renew *all* of
   your certificates, run "certbot renew"
 - If you like Certbot, please consider supporting our work by:

   Donating to ISRG / Let's Encrypt:   https://letsencrypt.org/donate
   Donating to EFF:                    https://eff.org/donate-le
The site is officially up and running with this. Let’s move on to the OAuth2 Proxy configuration.
OAuth2 Configuration
According the the documentation, there are two recommended configurations when using TLS and OAuth2 Proxy: where TLS is terminated at the OAuth2 or with a separate reverse proxy. Since I already have Nginx up and running, let’s proceed with the latter.
In following their documentation, you’ll simply point the Nginx to the exposed OAuth2 Proxy, and then let it proxy to the application. In our case, the application is Oxidized. But we’re getting ahead of ourselves. Let’s first configure OAuth2
OAuth2 Configuration File
OAuth2 outlines the required elements needed to autheticate against Azure AD as well as how to perform the needed conifguration within it. With all of this in mind, the following is an example configuration for OAuth2:
http_address = "0.0.0.0:4180"
reverse_proxy = true

upstreams = [
     "http://oxidized:8888/"
]

email_domains = [
     "*"
]

client_id = "<client ID>"
client_secret = "<Client Secret>"
provider= "azure"
azure_tenant= "Azure AD Tenant"
oidc_issuer_url= "https://login.microsoftonline.com/<Tenant ID>/v2.0"

cookie_secret = "<Generated Cookie Secret>"
cookie_secure = true
A couple of lessons learned in all of this:
- You’ll also need to following the provided instructions on how to generate the Cookie Secret for OAuth2.
- Give proper attention to the
http_addressconfiguration. Some places specify that it should be127.0.0.1; however, with this it will not be accessible outside of the OAuth2 container. - For
upstreams, I callout the oxidized container and use the port that would be used by it.
Docker Configuration for OAuth
With configuration file complete, the following is what my final Docker Compose looks like1:
version: '3.4'
services:
  oxidized:
    image: oxidized/oxidized:latest
    container_name: oxidized-test
    hostname: oxidized-test
    #ports:
    #        - '127.0.0.1:8889:8888'
    volumes:
    - ./oxidized/config:/home/oxidized/.config/oxidized/config
    - ./oxidized/router.db:/home/oxidized/.config/oxidized/router.db
    - ./oxidized/model:/home/oxidized/.config/oxidized/model
    - ./oxidized/data:/home/oxidized/.config/oxidized/devices.git/
    restart: unless-stopped
    depends_on:
      - oauth2-proxy
  oauth2-proxy:
    container_name: oauth2-proxy
    image: quay.io/oauth2-proxy/oauth2-proxy
    command: --config=/oauth2-proxy.cfg
    ports:
      - 127.0.0.1:4180:4180/tcp
    hostname: oauth2-proxy
    restart: unless-stopped
    volumes:
      - "./oauth2-proxy/oauth2-proxy.cfg:/oauth2-proxy.cfg"
Final Nginx Configuration
Last step is to make a final configuration change to Nginx:
server {
        location / {
                        proxy_pass http://localhost:4181;
                        proxy_set_header X-Forwarded-Host $http_host;
                        proxy_set_header X-Real-IP $remote_addr;
                        proxy_set_header X-Forwarded-Proto $scheme;
        }
        server_name test.cpajr.com;

        listen [::]:443 ssl; # managed by Certbot
        listen 443 ssl; # managed by Certbot
        ssl_certificate /etc/letsencrypt/live/test.cpajr.com/fullchain.pem; # managed by Certbot
        ssl_certificate_key /etc/letsencrypt/live/test.cpajr.com/privkey.pem; # managed by Certbot
        include /etc/letsencrypt/options-ssl-nginx.conf; # managed by Certbot
        ssl_dhparam /etc/letsencrypt/ssl-dhparams.pem; # managed by Certbot

}
server {
        if ($host = test.cpajr.com) {
            return 301 https://$host$request_uri;
        } # managed by Certbot


        listen 80;
        listen [::]:80;
        server_name test.cpajr.com;
        return 404; # managed by Certbot


}
If we’ve done this correctly, your next reload of the website will present the OAuth2 authentication page.
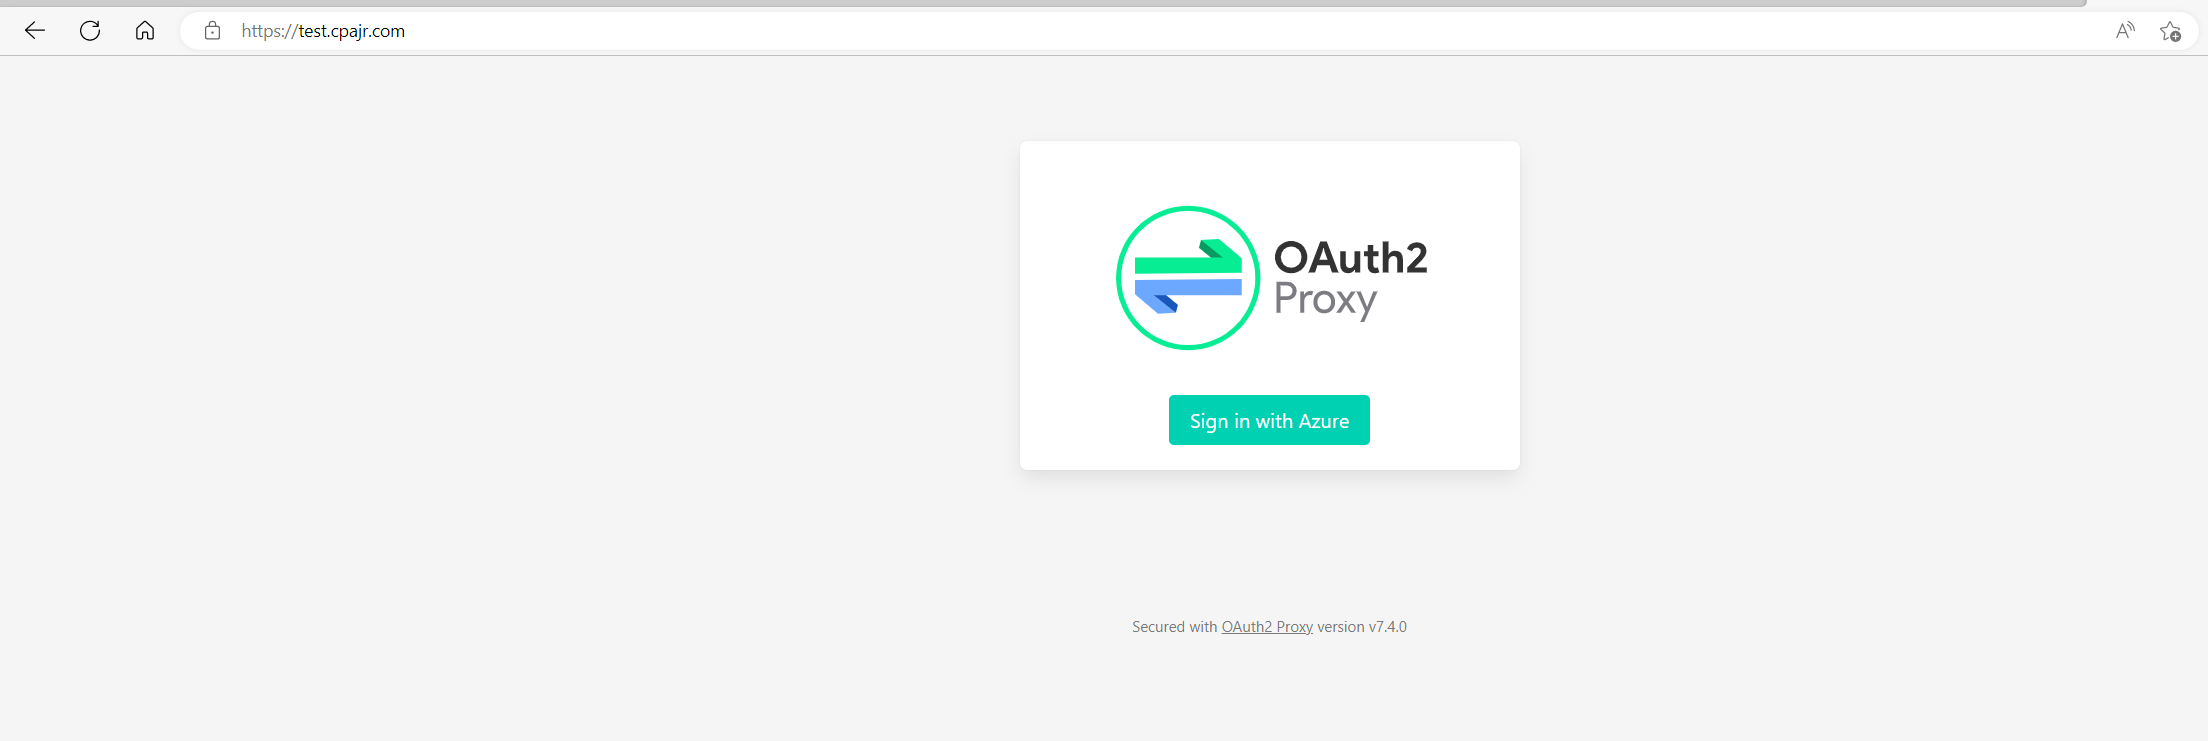
Hope this proves useful for someone.
-
You will notice that I commented out the ports exposed for Oxidized. I am doing this as Oxidized does not need to be exposed outside of the Docker’s networking. OAuth2 will proxy to the application internally. ↩